

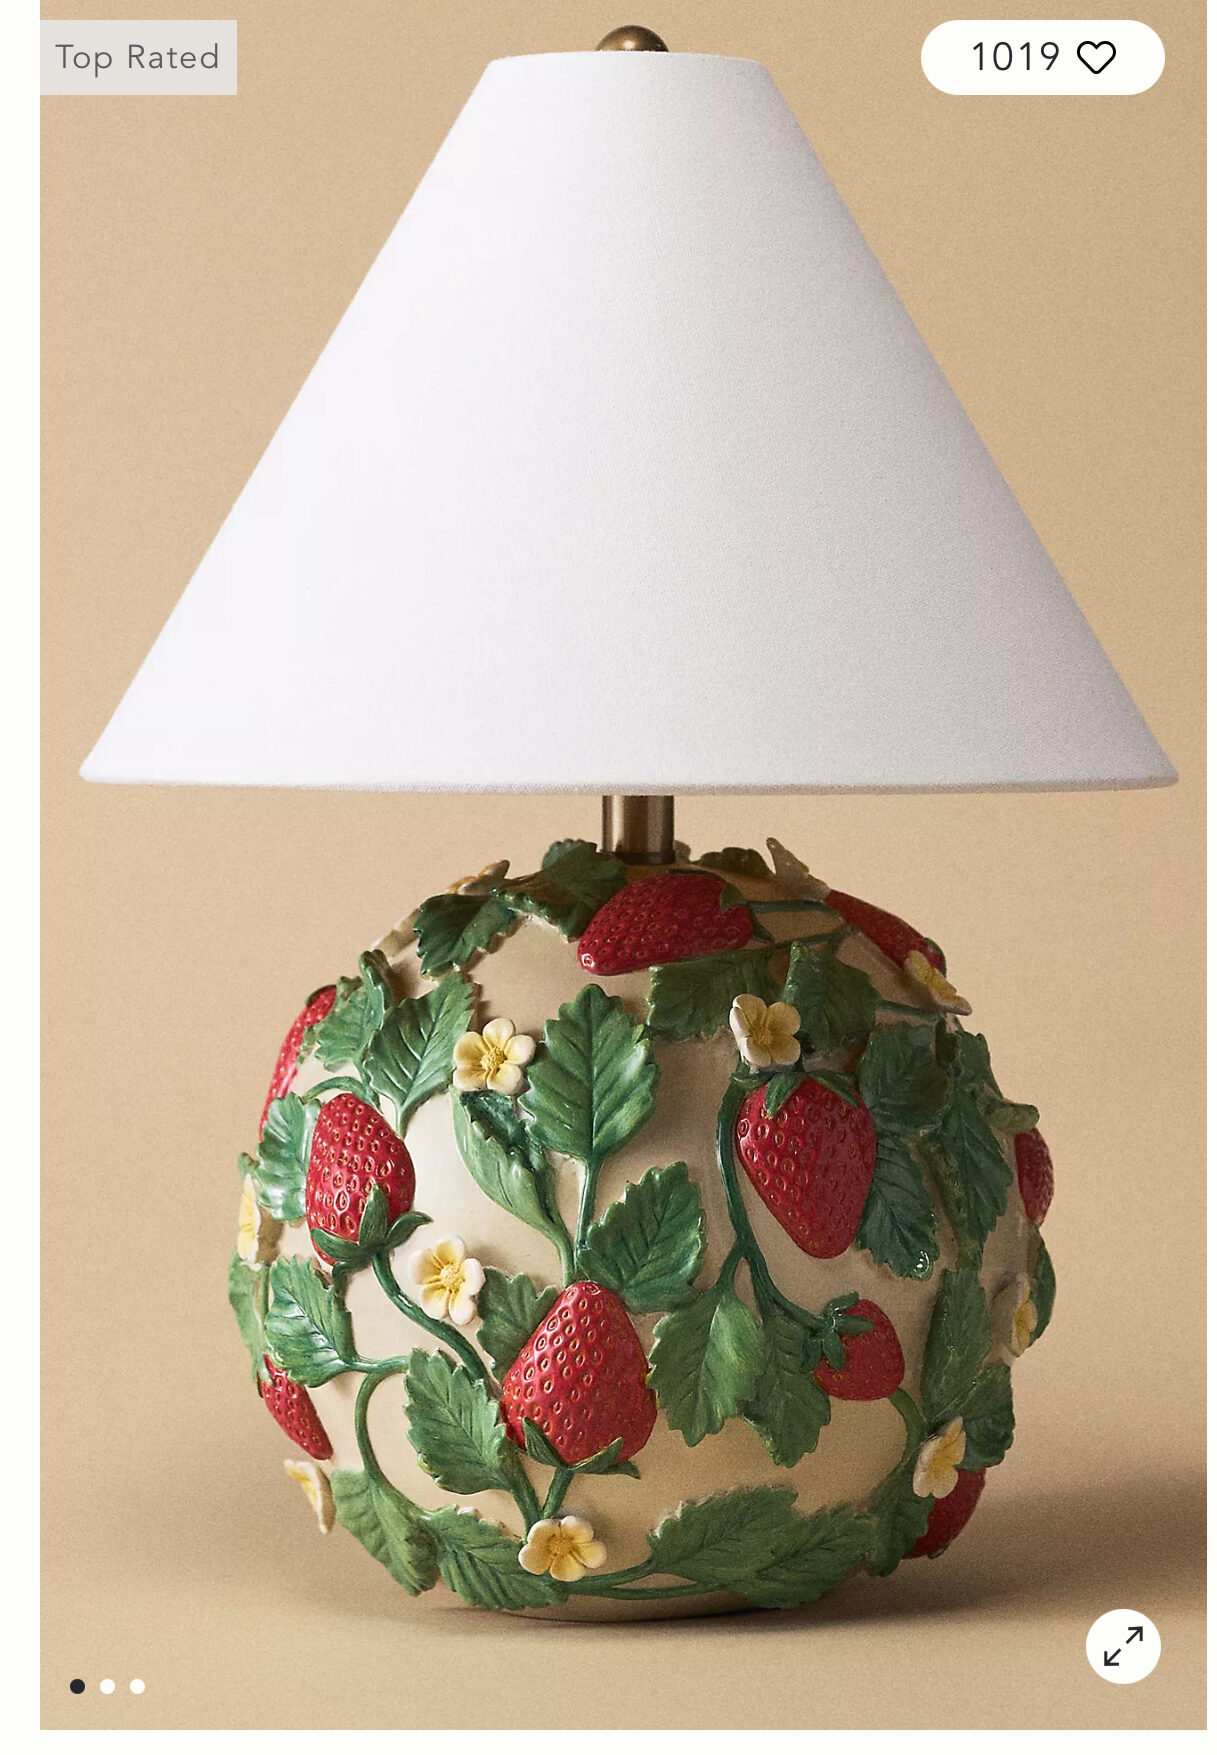
DIY Anthropologie Dupe Lamp: A $16 Thrift Flip That Looks Like $200
If you’ve ever fallen in love with an Anthropologie lamp (and then winced at the price tag), you’re not alone. Their home decor is gorgeous but rarely budget-friendly. The good news? With just a thrifted base, a little clay, and some paint, you can get the same high-end Anthropologie vibe without dropping $200+.
This makeover was quick, fun, and done entirely during nap time. Yep, nap time = DIY time around here. And let me tell you… this little flip scratched the creative itch big time.
Why This Lamp Flip Works
Not every project has to be huge to feel satisfying. This one checked all the boxes:
- It was budget-friendly – my total cost was $16.
- It was fast – done in less than an afternoon.
- It gave me a confidence boost – nothing like stepping back and thinking, “Wow, I made that.”
The exact lamp at Anthropologie would have cost me $228. I saved more than $160, and honestly, saving $160 is basically the same as making $160, right?
The Before: A Thrifted Lamp With Potential
This project started with a random thrift store find. The lamp was a little sad and outdated, but it had good bones:
- A curvy, sculptural base.
- A sturdy structure (no wobbles, no cracks).
- A $5 price tag.
I wasn’t crazy about the finish, and the shade definitely wasn’t my style, but I could see the potential. That’s the trick with thrift store flipping, ignore the colour and focus on the shape.
What You’ll Need
Here’s everything I used to turn a sad little thrift lamp into an Anthropologie-worthy dupe. I’ve linked the exact (or very similar) supplies so you can grab them too.
- Clay sculpting tools – handy for shaping the air dry clay and adding texture.
- Air dry clay – the secret to that artisan, ceramic-inspired look.
- Paintbrush set – different sizes for layering paint and blending textures.
- Green acrylic paint – great for mixing custom tones.
- Yellow acrylic paint – warm undertones to mimic natural clay.
- Red acrylic paint – perfect for creating earthy terracotta shades.
- Clear gloss sealer – locks everything in with a durable finish.
- A simple, neutral lamp shade (I found mine for $10 at the thrift store).
Step-by-Step: How I Made My DIY Anthropologie Dupe Lamp
This project is beginner-friendly, but the results look anything but. It’s the kind of makeover that gives you designer vibes without requiring professional skills or expensive supplies. I’ll walk you through every step of the process, including a few tips I learned along the way.
Step 1: Clean the Lamp
The very first step is often the most overlooked, cleaning. Before you add anything new, you want a clean, dust-free surface so your clay and paint will adhere properly.
- Start by wiping the lamp base with a damp cloth and a drop of mild soap.
- Focus on grooves, crevices, and the bottom edge where dust tends to collect.
- If the lamp is extra grimy, use a soft scrub brush to loosen dirt.
Pro Tip: Don’t skip this step! Even the tiniest bit of dust or grease can prevent paint from sticking evenly. I like to think of this as “resetting” the lamp so it’s ready for its glow-up.
Once the lamp is clean, let it dry completely. Even a little hidden moisture can cause problems when you apply clay.
Step 2: Prime your lamp.
Before adding colour, give your lamp a good base coat. I used white acrylic paint to prime the surface, making sure the vines, leaves, and flowers were fully covered. This step helps the colours pop later and ensures an even finish.


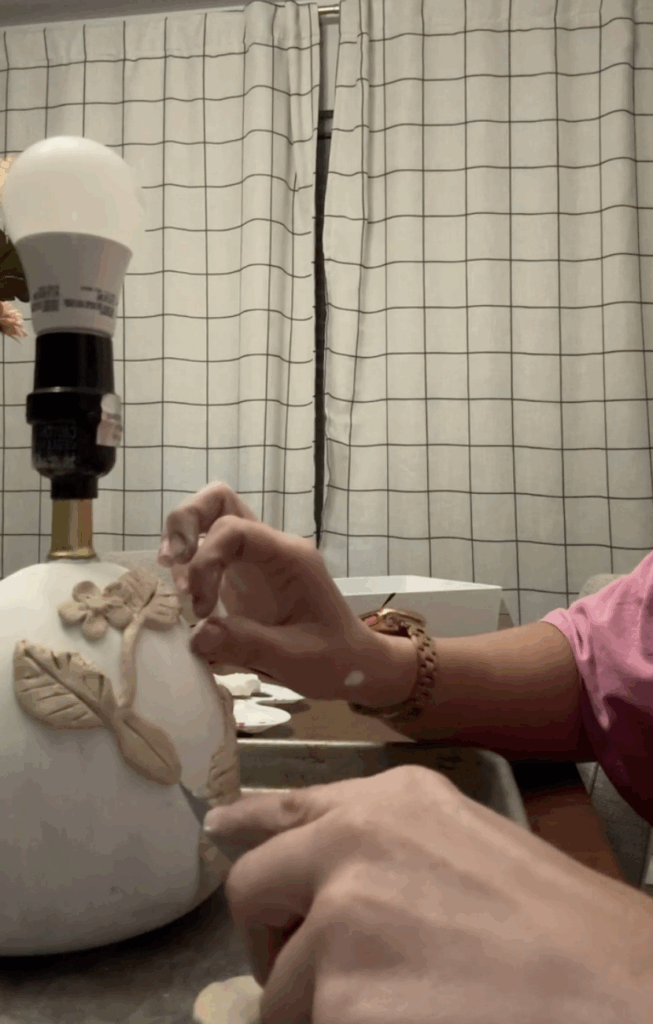
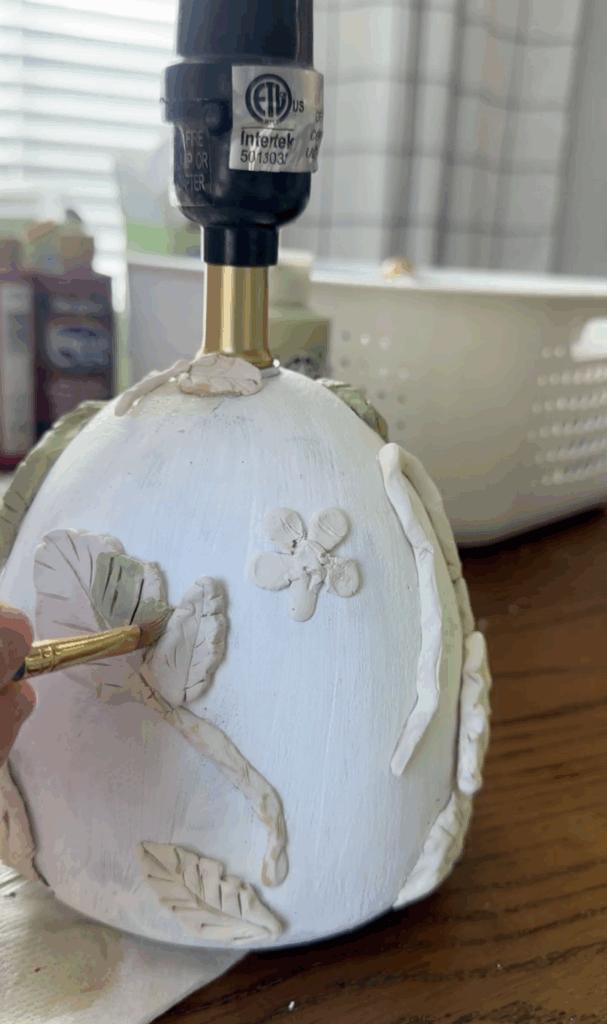
Step 3: Sculpt the Vines, Leaves, Flowers, and Strawberries
This is the step where the lamp starts to feel like a piece straight out of Anthropologie’s home décor section. Instead of simply smoothing clay onto the base, I built a full strawberry plant design directly onto the lamp.
Here’s how I did it:
- Vines – Roll out thin ropes of air dry clay and gently press them onto the lamp base. Curve them naturally around the lamp so they look like they’re climbing.
- Leaves – Flatten small pieces of clay into ovals, then use a clay sculpting tool to carve vein lines. Press them onto the vines so they feel like part of the design.
- Flowers – Roll tiny clay balls, pinch them into petals, and arrange five around a center dot for a strawberry blossom. Add as many or as few flowers as you’d like.
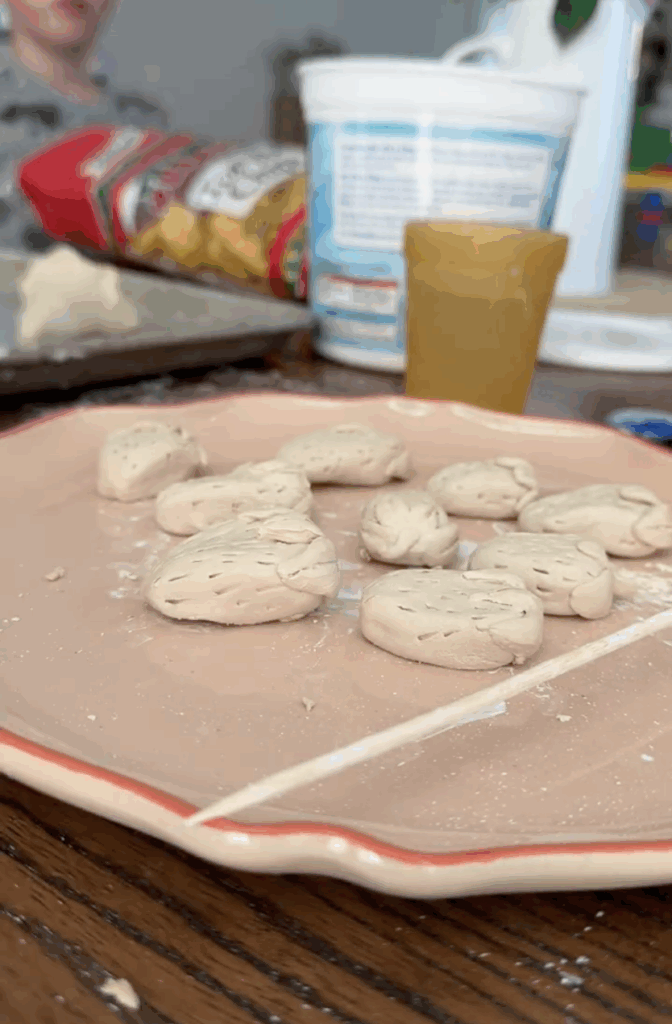
- Strawberries – Roll 2-inch-sized balls of clay and pinch one end into a teardrop shape. Use a tool (or toothpick) to press tiny seed-like indentations all over. Set these aside separately to dry, you won’t attach them to the lamp yet.
Pro Tip: Keep a small dish of water nearby. Dabbing your fingers in water helps smooth the clay and blend edges seamlessly into the lamp base.
Step 4: Let It Dry
Air dry clay will harden naturally, but the drying time depends on thickness and the temperature of your room.
- Thin layers: These can firm up in just a couple of hours.
- Thicker patches: Expect around 24 hours for a full cure.
Be patient, rushing this step can cause cracks or smudges later when you paint. I let mine sit overnight to be safe.
Optional Step: If cracks appear, don’t panic! Just patch them with a little more clay and smooth it out. It blends seamlessly once painted.
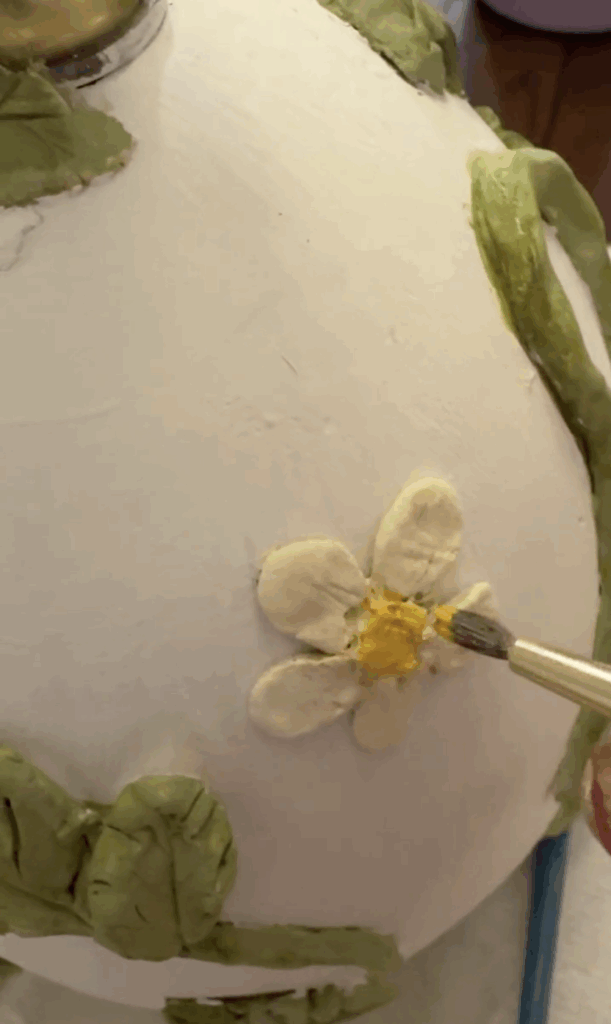
Step 5: Paint
Here’s where the magic really happens. The paint is what brings the strawberries and vines to life, turning simple clay into a lamp base that feels straight out of Anthropologie.
I gave the lamp an extra touch-up coat of white acrylic paint anywhere it looked a little patchy. This evened out the surface and made sure the colours layered on top would really stand out.
Then I moved on to building colour in layers:
- Strawberries – I used a bold red on each strawberry. Once it dries, if you want a more realistic look, you can deepen the bottoms with a slightly darker red and add a touch of soft pink toward the tops. This gave them that juicy, ripe look instead of a flat, one-colour finish. It depends on the vibe you are going for.
- Vines and leaves – For all of these I painted them green.
- Blossoms – The tiny flowers were kept simple with white petals and a pale yellow center, just enough to break up the greenery and tie the whole design together.
Using a paintbrush set, I switched between wide brushes for coverage and fine tips for any details or touch-ups I needed to add.
Pro Tip: Step back while painting. Up close, details can look messy, but from a little distance you’ll see the bigger picture.

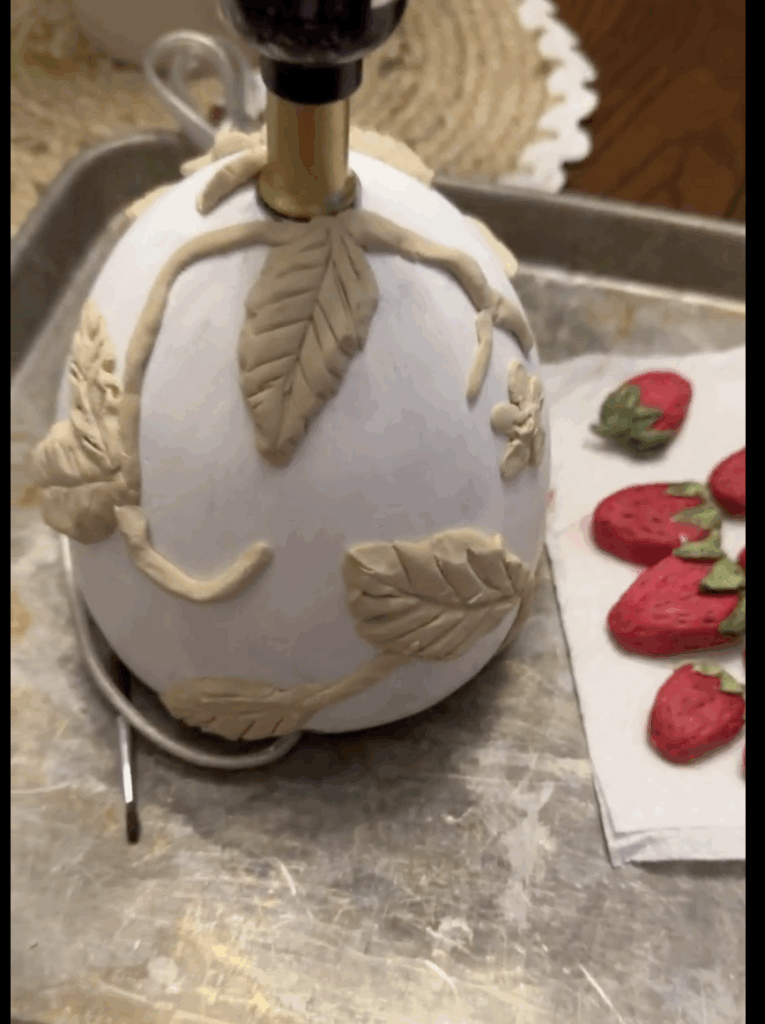
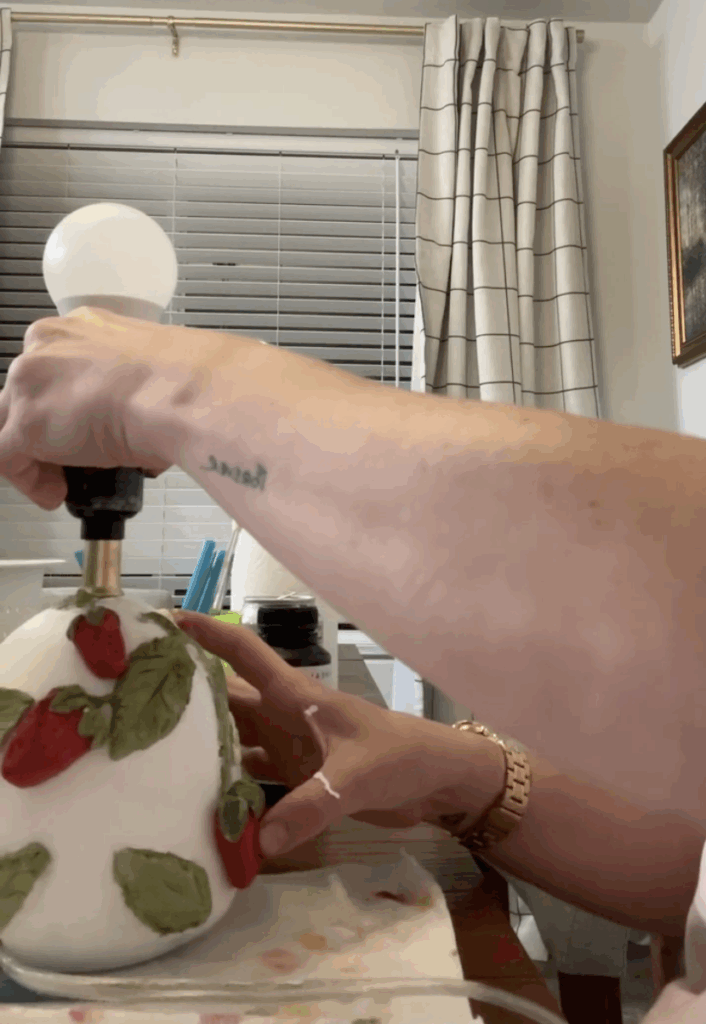
Step 6: Attach the Strawberries
Once everything is dry, use an E6000 glue (I used a this one) to attach the strawberries to the lamp. Tuck them among the vines and leaves, arranging them in clusters so they look like they’re growing naturally.

Step 7: Seal It
Once the paint is completely dry, it’s time to protect your hard work. I used a clear gloss sealer.
Here’s why sealing matters:
- It locks in the colour and prevents chipping.
- It gives the surface a subtle sheen, which instantly makes it look more professional.
- It makes the lamp easier to clean, just a quick dusting and you’re done.
Pro Tip: If you prefer a matte, pottery-like finish, choose a matte sealer instead of gloss. Either works beautifully, it just depends on the vibe you want.
Step 6: Swap the Shade
The lamp base is now giving Anthropologie-level style, but the shade is just as important. The wrong shade can drag the whole piece down.
The original thrifted shade really wasn’t working, so I swapped it for a simple, neutral linen-look shade I found for $10. It instantly elevated the entire lamp, balancing the wild base with a clean, modern top.
Pro Tip: When in doubt, go neutral. Creams, whites, and soft beige tones pair beautifully with slightly chaotic patterns and give that “designer showroom” look.
Step 8 (Optional): Style It
Place your finished lamp somewhere it can shine, literally. On a bedside table, console, or entryway, it will instantly draw attention. Pair it with books, greenery, or even other quirky finds for a styled, Anthropologie-inspired vignette.
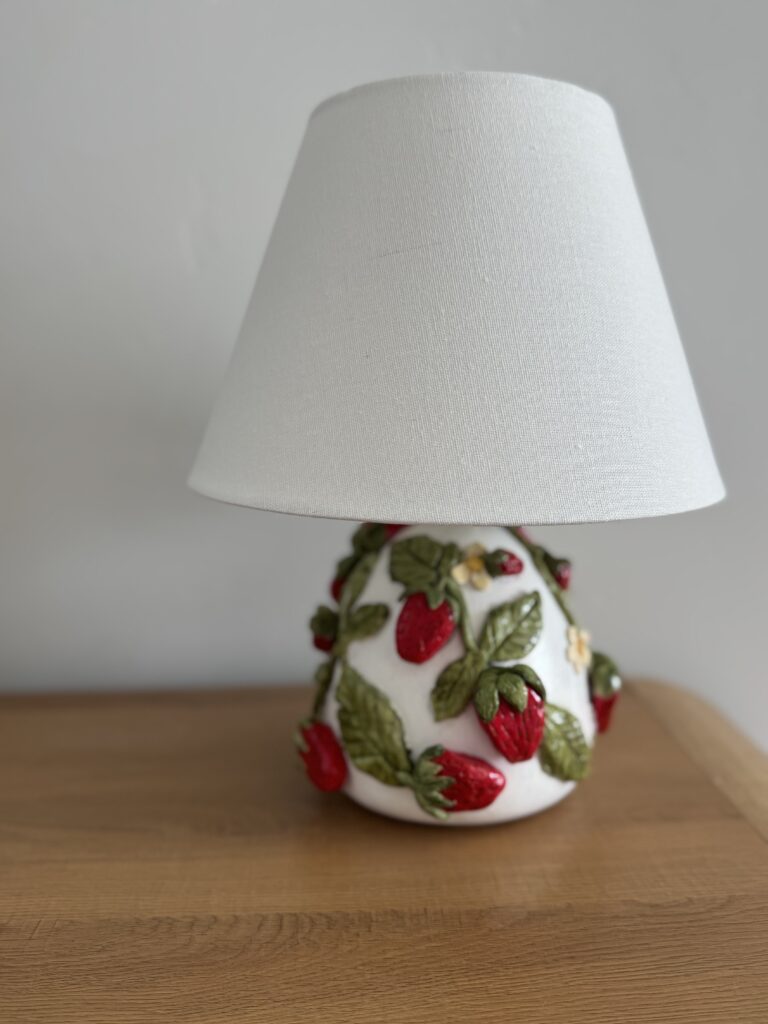
The Finished Look
The final lamp is whimsical, playful, and one-of-a-kind, like something you’d spot in an Anthropologie display, but with your own personal twist. The sculpted vines and leaves give it movement, the tiny blossoms add charm, and the bright red strawberries steal the show, making the whole piece feel like a functional work of art. With its fresh linen shade on top, it’s a perfect balance of quirky and elegant, the kind of lamp that makes guests ask, “Where did you get that?”
The After: Designer Vibes on a Thrift Budget
And just like that, my $16 lamp (base + shade) looked like something straight out of an Anthropologie display.
Why it works:
- The detailed base feels handmade and organic.
- The neutral palette fits any space.
- The new shade adds polish and balance.
Friends have already asked where I bought it, and the best part was saying “I made it.”
Tips for Finding the Best Lamps to Flip
If you’re ready to try this yourself, here’s what to look for when thrifting:
- Shape first – focus on a silhouette you love. Colour and finish can be changed.
- Solid base – ceramic, resin, or metal work best.
- Check wiring – make sure it works, or plan to rewire.
- Skip plastic – it’s harder to customise and make it look high-end.
Why Small DIY Projects Like This Matter
This wasn’t a huge room makeover or a complicated build. It was a nap-time project that left me with something beautiful and useful. And that’s the magic of small flips:
- They’re fast.
- They’re budget-friendly.
- They remind you that your creativity matters.
Sometimes all it takes is a $16 lamp and an afternoon of painting to give your space a glow-up.
Grab Your Free Starter Kit
I’ve put together a free starter kit to help you start flipping with confidence! Inside, you’ll find simple, affordable walkthroughs and tips to help you transform thrifted finds into pieces you’ll actually be proud to show off.
Grab your free starter kit here.
DIY, But Make It Anthro: FAQ
It’s a DIY or budget version of an expensive Anthropologie lamp, made using affordable materials like air dry clay and paint.
Mine cost $16 total; $5 for the thrifted lamp and $10 for a new shade. Compare that to $200+ at Anthropologie!
You’ll need a thrifted lamp, air dry clay, a few acrylic paints, brushes, and a clear sealer.
Yes! It’s a perfect starter project for anyone new to DIY because it’s quick, affordable, and hard to mess up.
Thrift stores, Facebook Marketplace, or even your own attic are great places to start. Look for solid bases with interesting shapes.
