

Painted Piano Makeover: How I Turned a Thrifted Find Into the Star of My Living Room
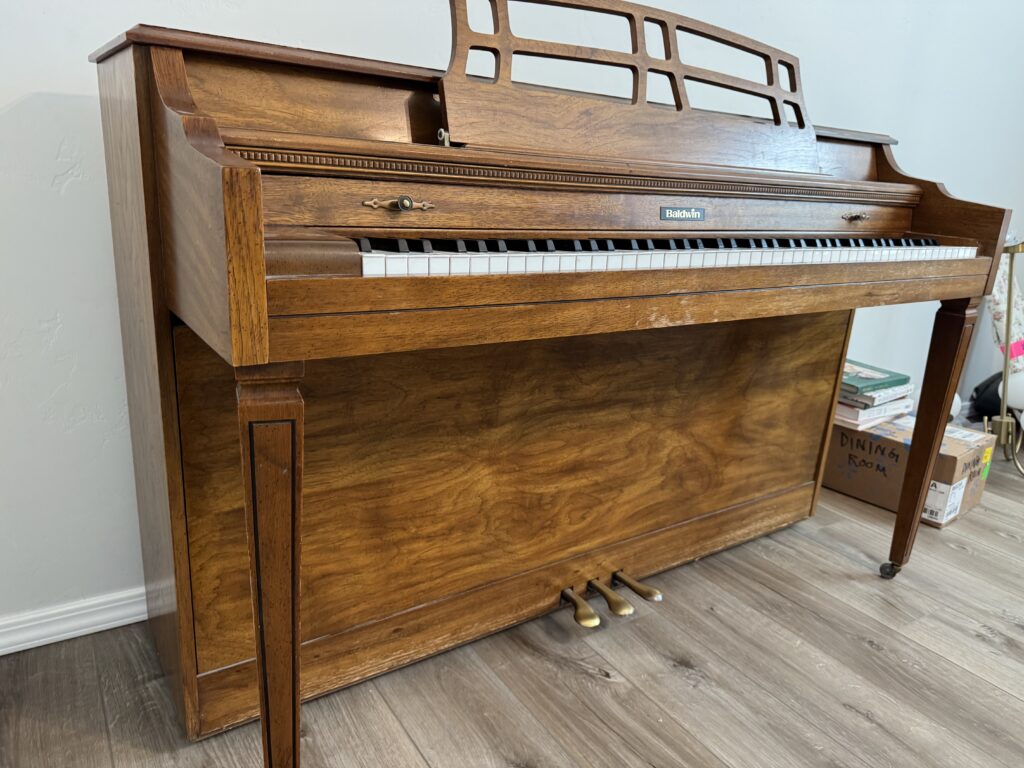
Have you ever walked into a thrift store and found something so beautiful you couldn’t believe your luck? That was me when I spotted this piano. It was stunning, it sounded amazing, and it was only a fraction of what a new one would cost. The catch? It needed some serious love.
I’ll be honest, flipping furniture can be intimidating. But this project reminded me why I fell in love with the process in the first place. With less than $100, a little elbow grease, and one Saturday afternoon, this piano went from overlooked to main character energy in my living room.
And the best part? You don’t need years of experience to do something like this. In fact, I’ve put together a free Flip Kit starter guide with everything you need to start flipping furniture like a pro. Grab yours here before you run to Marketplace to find your first piece.
Why Paint a Piano?
A piano is more than just an instrument, it’s a piece of furniture. In many homes, it becomes the anchor of the room, a place where people gather, where kids practice, and where the holidays feel extra magical.
But if you’ve ever searched “free piano” on Facebook Marketplace, you already know the truth: there are tons of them. Many are scratched, faded, or stuck in a 90s orange oak finish that just doesn’t fit modern spaces.
That’s where paint comes in. With the right product and prep, you can breathe new life into a thrifted piano and turn it into a statement piece that looks custom, and costs a whole lot less than buying new.
Supplies I Used
Here’s everything I grabbed for this makeover. I’ll link the exact or similar products I used so you can recreate this look at home:
- Beyond Paint All-in-One Paint (the star of the show! Use code KENNA for a discount)
- Dawn dish soap + water for cleaning
- Furniture cleaning cloths
- Drop cloths (I used fabric, but you can also use plastic)
- Rub ‘n Buff in Antique Gold for the hardware
- Good quality painter’s tape
- Angled paintbrush
- Small paint brushes
- Furniture-safe topcoat
Want a full list of budget-friendly flipping supplies I swear by? It’s all inside my free Flip Kit.
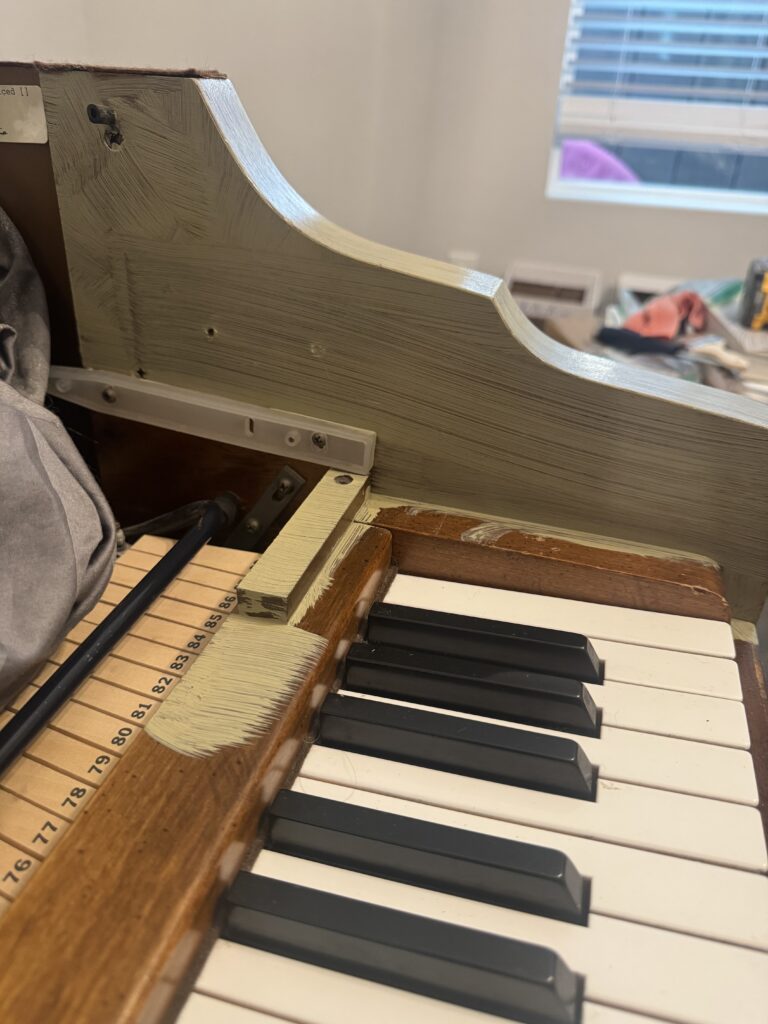
Step 1: Clean Thoroughly
Prep is everything when it comes to furniture flips. Before you even think about opening a paint can, give your piece a really good scrub. I mixed up my go-to cleaner (just warm water and a little Dawn dish soap) and went to town with a sponge and soft cloths. You’d be shocked at how much dirt, polish build-up, and sticky fingerprints come off a thrifted piece once you really put in the scrubbing time.
Even if the piano looks clean at first glance, trust me, there’s hidden residue that will prevent your paint from sticking properly. Oils from years of playing, layers of old furniture polish, and even plain old dust can create a barrier. Skipping this step might save you ten minutes, but it can completely ruin your finish later. Take the time now, and you’ll thank yourself when your paint goes on smooth and actually stays put.

Step 2: Pick the Right Paint
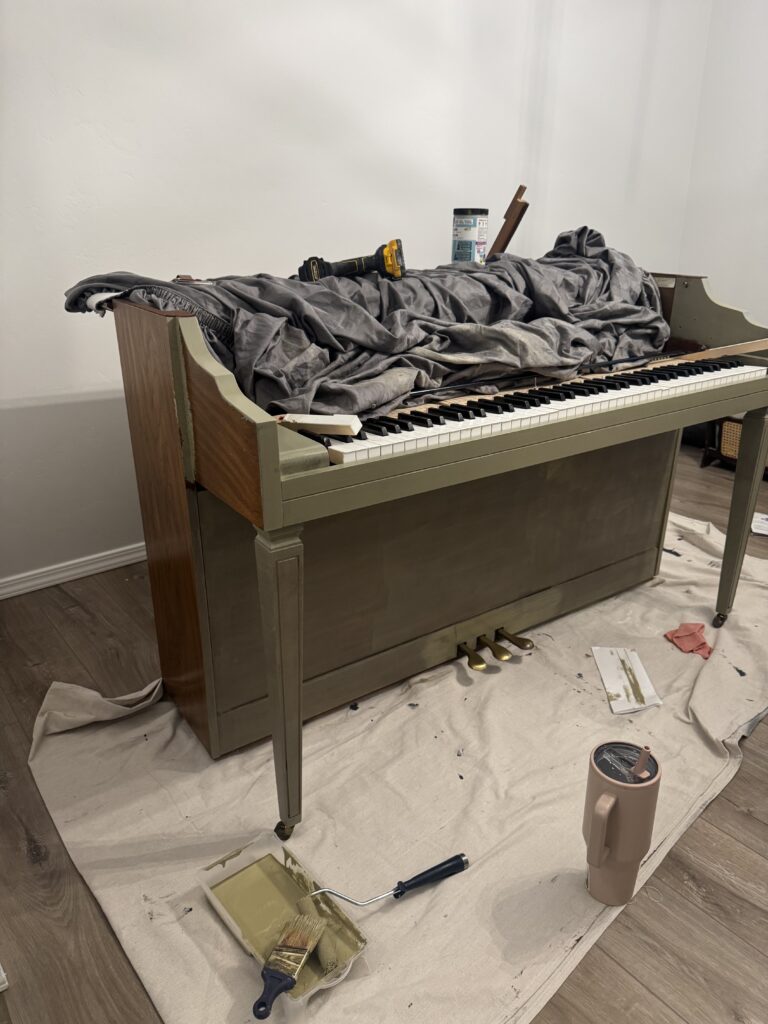
This is where the magic happens. I’m officially obsessed with Beyond Paint. This isn’t sponsored, I just couldn’t believe how easy it made the entire process. No sanding, no priming, no stressing over whether it would adhere. I literally opened the can and started painting.
The coverage was incredible, it went on evenly, with a rich, velvety finish that completely transformed the piano. The best part? It dries fast. I was able to finish this whole project in an afternoon, which still blows my mind. For such a big piece of furniture, it felt surprisingly effortless.
That first coat is always the scariest, and looks horrible. You’re covering up perfectly good wood and wondering if you made a huge mistake. But trust the process, the first layer is just the foundation. By the second coat, you’ll see the vision come to life.
Pro Tip: If you’re new to flipping, look for paints that combine primer, bonder, and topcoat in one. It saves so much frustration (and money), and it cuts your project time in half. That’s exactly why Beyond Paint is my current obsession; it’s forgiving, beginner-friendly, and produces such a professional-looking finish.

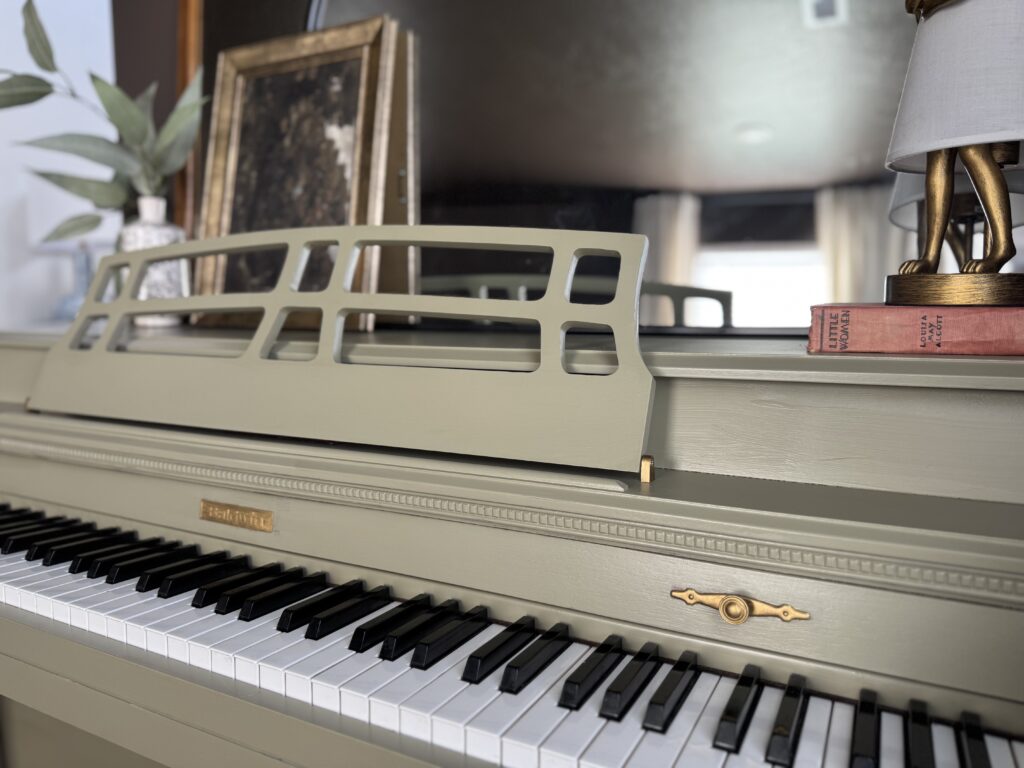
Step 3: Update the Hardware
Pianos are full of little details, like pedals, hinges, or key covers, that instantly give away their age. Instead of replacing them (which can get expensive and tricky to find), I grabbed a tube of Rub ’n Buff and gave them a quick update.
It took less than ten minutes, but the effect was huge. Suddenly those dull, brassy pedals looked polished and intentional, tying the whole piece together without losing that traditional charm. It’s one of those little touches that makes the difference between “someone slapped some paint on this” and “wow, this piano was custom designed for the room.”
If you’ve never used Rub ’n Buff before, it’s basically a tiny miracle in a tube. A little goes a long way, and it instantly freshens up old metal hardware with almost no effort. It’s inexpensive, quick, and one of those supplies I always keep on hand for flips.
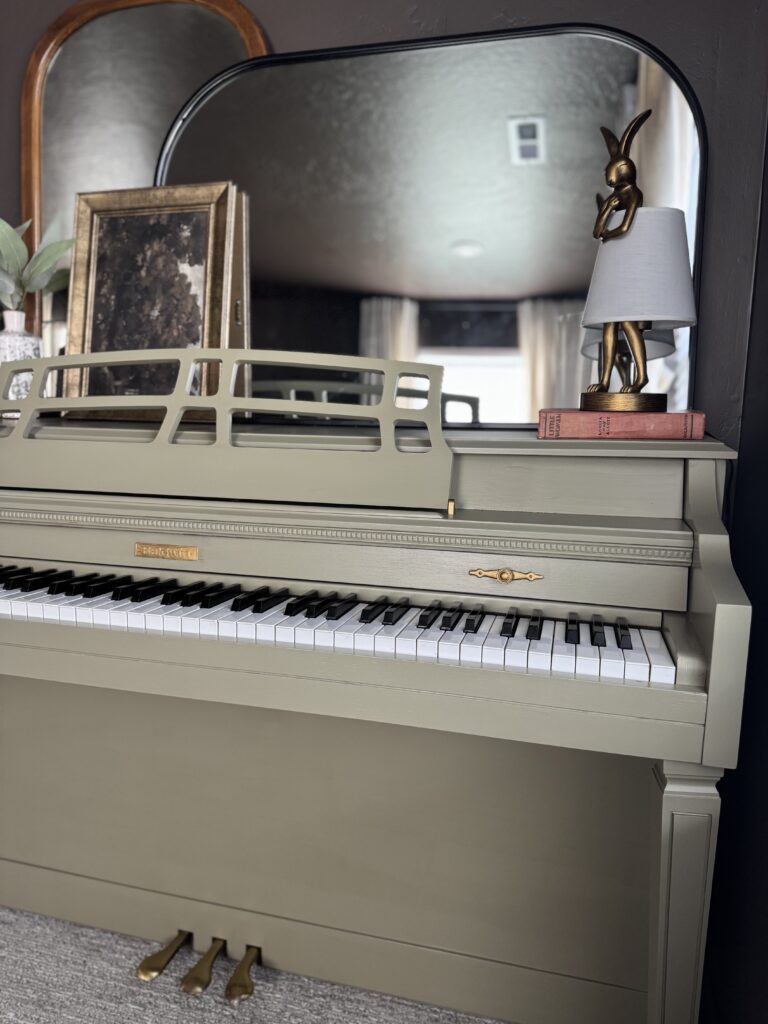
Step 4: Stage Your Piece
This step might be my favourite, because it’s where the project finally feels finished. Staging is what transforms a painted piece from just “redone furniture” into something that actually belongs in your home.
For the piano, I styled it with a few simple but intentional touches:
- Two mirrors layered together to reflect light and add depth
- Vintage books to bring in warmth and character
- A quirky gold rabbit lamp that adds personality (and let’s be honest, nothing beats soft piano music paired with a little ambient glow)
- A vase with greenery (yes, it’s faux, but it still adds that fresh, organic look)
When your piece is styled well, it blends seamlessly into the room instead of sticking out like an afterthought. It’s not just about making it pretty for Instagram (though it definitely helps there too). Staging is what makes you fall in love with your project every time you walk past it. It connects the makeover to your actual home, and that’s when a flip really shines.
The Big Reveal
Four hours. That’s all it took to take this piano from dated to dreamy. The new color completely changed the vibe of the room, making it feel polished, cozy, and timeless. Friends and family can’t stop commenting on it, and it makes me smile every single time I walk past.
And here’s the best part: you can do this too. You don’t need a workshop, you don’t need fancy tools, and you don’t need to spend hundreds. You just need the right process (and maybe a little encouragement).
That’s exactly why I created my free Flip Kit starter guide, so you can skip the guesswork and start flipping with confidence.
Piano flip before and after

Painted Piano Makeover FAQs
Not always. Many modern furniture paints (like Beyond Paint) are formulated with built-in primer and bonder, so you can skip the sanding step. If your piano has a super glossy finish or deep scratches, a light scuff sand may help, but in most cases, a good clean is all you need.
Yes! Painting only affects the exterior casing of the piano, not the internal mechanics. As long as you protect the keys and avoid getting paint inside the action, the sound won’t change at all.
The best paint for a piano makeover is a durable, all-in-one furniture paint. Products like Beyond Paint save time by combining primer, bonder, and topcoat in one. This ensures the finish lasts without peeling or chipping.
Painter’s tape is your best friend here. I taped off the edges of the keys and used a drop cloth to cover the rest of the piano while painting. You can also remove some exterior panels for easier access and to prevent drips.
You can complete a painted piano makeover for under $100 if you already own basic supplies like brushes and drop cloths. The paint itself is usually the biggest expense, but one quart is often plenty for an upright piano.
Absolutely. Pianos are easy to find for free or cheap on Facebook Marketplace, and many of them still sound amazing. A fresh coat of paint not only updates the look but can turn a dated instrument into a statement piece in your home.
Storytime: My First Flip Ever
Let me tell you about the time I bought a $15 nightstand and flipped it for $200.
It wasn’t glamorous. I was working outside in my parents’ yard because the garage was full. I didn’t have a clue what I was doing. But I was determined.
I staged it in the front room, listed it online, and within hours, someone handed me cash. That moment lit a fire in me. It showed me what was possible with just a little vision and effort.
Did I make mistakes? Absolutely. I used the wrong paint once and watched it peel off like a sticker. But each flip taught me something new, and I got better with every project.
That’s why I made the Flip Kit. It’s all the shortcuts, lessons, and insider tips I wish I had when I started, so you don’t have to learn the hard way.
Thinking About Selling Your Flips?
Flipping furniture isn’t just a creative hobby, it can be a legit side hustle. If you’re curious about taking the
Flipping furniture isn’t just a creative outlet, it can also be a legit side hustle (or even a full-time gig if you want to dream big). Once you’ve got the basics down, it’s natural to wonder: could I actually make money doing this?
If that thought has crossed your mind, I’ve got two resources that can help you go from hobbyist to confident seller:
1. Top Dollar Flips (just $7!)
This guide is the perfect next step after grabbing the free Flip Kit. Inside, I break down:
- What to buy and what to skip – not everything is worth your time, and knowing the difference saves you so much energy.
- The supplies you actually need – no giant tool list required, just the essentials.
- How to stage like a pro – so your listings stop the scroll and actually sell.
It’s short, actionable, and designed to help you start selling right away, without spending weeks overthinking it.
Grab Top Dollar Flips for $7 here
2. The Flip Formula (my full book!)
If you’re ready to dive deeper, my book The Flip Formula: Learn to Flip Furniture Like a Pro — Even If You’ve Never Held a Paintbrush, is where I share everything I’ve learned from years of flipping in a 45+ page guide.
For $37, you’ll get the complete system that takes you from start to finish; sourcing, cleaning, painting, staging, selling, and scaling. It’s packed with step-by-step strategies, real-life examples, and the confidence boost you need to actually put yourself out there.
Check out The Flip Formula here
Think of it this way:
- The Flip Kit = your free starter pack.
- Top Dollar Flips = your first small investment in turning flips into cash.
- The Flip Formula = your full blueprint for building flipping into a side hustle (or more!).
Wherever you are in your journey, there’s something here to help you take the next step.
Final Thoughts
Flipping this piano was one of the most satisfying projects I’ve ever done. It reminded me that you don’t need endless time or a giant budget to create something beautiful, you just need a vision and the right tools.
If you’re ready to try your own furniture flip, download my free Flip Kit. And if you want to go one step further, check out Top Dollar Flips or The Flip Formula, your wallet will thank you.
Happy flipping, friend!
